iOS Device Settings
Before going through the process of configuring iOS devices to run on GigaFox, go through the following settings adjustments.
NOTE: The specific path to access a feature's settings may vary depending on the device's iOS version.
'Trust This Computer' Alert
All iOS devices must "trust" the computer to which they are connected. To "trust" the communication between the computer and device:
- Plug device into the computer.
- On the physical device, click Trust on the Trust this Computer? alert.

Reduce Screen Brightness
To reduce battery usage without affecting the display:
- Open Settings > General > Accessibility Display Accommodations.
- Scroll to Auto-Brightness and toggle Off.
- Slide the brightness slider to the lowest setting.
Enable UI Automation
Beginning with iOS 8, devices must enable UI Automation.
To enable UI Automation:
- Connect device and launch Xcode.
- On the device, open Settings > Developer.
- Toggle on Enable UI Automation.

NOTE: The Developer settings option will also be available when a device connects to deviceControl.
iOS Provisioning Profile
The provisioning profile is a collection of digital components that uniquely identify and tie developers and devices to an authorized Development Team, enabling a device to be used for testing, or in this case, be provisioned to connect to GigaFox.
This tutorial assumes you are enrolled in the Apple Developer Program and your assigned role includes the ability to create a provisioning profile.
Register iOS Devices
For Apple to allow the distribution of an app, each physical iOS device the app will be tested on must be registered with Apple's Developer Program.
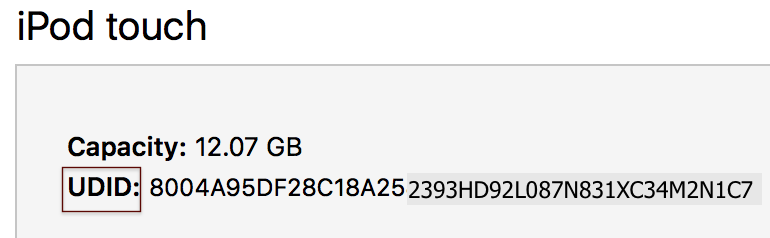
- Retrieve the device's UDID.
- Connect the device to an Apple computer and open iTunes.
- On the top left, click the mobile device icon.
- The device's UDID is located in the device's details box. If the UDID is not immediately displayed, click on the device's ID line (under Capacity) until it displays the UDID. You may see Model Identifier, Serial Number, and ECID before getting to the device's UDID.
- To register one or more devices:
- Log into your developer.apple.com account and click on Certificates, Identifiers & Profiles.
- Confirm the iOS Certificate page dropdown menu option is on iOS, tvOS, watchOS.
- Under Devices, click All or the specific type of device to register (i.e. iPod Touch).
- On the top right, click the + (plus) sign.
- If registering a single device, under Register a Device, enter a Name and the device's UDID and click Continue.
- If registering multiple devices, under Register Multiple Devices page, upload a file with the Devices ID and Name and click Continue.
- On the Review and Register page, confirm the information is correct and click Register.
- Team ID: 123ABC456XYZ.
- Bundle ID: com.companyname.appname
- Log into developer.apple.com account.
- Under Identifiers, select App IDs.
- On the top right, click the + button.
- On the Registering an App ID page:
- Under App ID Description, enter the App ID description name.
- App ID Prefix will display the Team ID.
- Under App ID Suffix, fill in Explicit App ID or Wildcard App ID. Any of the following are acceptable IDs:
- mobilelabsinc.deviceControl
- *
- com.mobilelabsinc.*
- In the App Services section, enable the necessary services for the App and click Continue.
- To complete the registration, in the Confirm your App ID page, review the information. If the app's information is correct and click Register.
- Open Xcode.
- Click on the Xcode dropdown menu, select Preferences.
- Click Accounts.
- On the Sign in with your App ID dialog, sign in and click Sign In.
- On the bottom left of the Apple ID column, click the + (plus) button.
- On the Select which type of account you want to create dialog, select Apple ID and click Continue.
- Click on Manage Certificates.
- On the Signing certificates for "Company Name", click the + (plus) button and select iOS Development. The iOS Development Certificate will be created and added to the Development list on the Apple Developer Certificates page.
- The certificate will automatically be loaded into the Keychain Access app. To confirm, click login and check that the iPhone Developer:Name(Certificate Number) is present.
- Log into your developer.apple.com account and click on Certificates, Identifiers & Profiles.
- Under Certificates, Identifiers & Profiles, set the dropdown menu to be iOS, tvOS, watchOS.
- Under Certificates, select Development.
- On the top right, click the + (plus) button.
- On the What Type of certificate do you need page, select iOS App Development, scroll down, and click Continue.
- If you have already created the Certificate Signing Request (CSR), click Continue. Otherwise, follow the steps to create it.
- On the Generate your certificate page, click Choose File to upload the CSR.
- Click Continue.
- On the Your certificate is ready page, click Download. The certificate will be located in the iOS Certificates (Development) list.
- The certificate will automatically be loaded into the Keychain Access app. To confirm, click login and check that the iPhone Developer:Name(Certificate Number) is present.
- A small green circle with a check mark followed by This certificate is valid is listed among the certificate's details.
- A disclosure triangle is present to the left of the certificate. If the triangle is not visible, the private key is missing.
- Open Keychain Access.
- On the bottom left, click Certificates.
- Expand the certificate information and highlight both the certificate and private key.
- With both highlighted, right click and select Export 2 items.
- Name the certificate.
- Add tags (optional).
- Select where the certificate will be saved.
- In the Password dialog, enter a password, verify it and click OK.
- Back in Keychain Access, add the .p12 file to System > My Certificates section. This step may ask for login information.
- In the Keychain Access wants to Export "access" from Keychain dialog, select Allow.
- Open Keychain Settings.
- Confirm that your certificate is located in System > My Certificates. If it's located in another section of the Keychain:
- Highlight the certificate.
- Drag the certificate to System.
- Select Allow on the kcproxy want to export key "access" from your keychain dialog.
- Double-click the private key to access the Attributes/Access Control dialog.
- In Access Control, select Allow all applications to access this item and click Save Changes.
- Log into developer.apple.com account.
- Select Certificates, Identifiers & Profiles
- Under Provisioning Profiles select Development.
- On the iOS Provisioning Profiles (Development), on the top right, click the + button.
- In the What type of provisioning profile do you need?, select iOS App Development
- In the Development section, select iOS Development and click Continue.
- Select the App ID you created earlier and click Continue.
- On the Select certificates page, enable the Select All option and click Continue.
- On the Select devices page, enable the Select All option and click Continue.
- In the Name this profile and generate page, give the Profile a name and click Continue.
- Download and save the Provisioning Profile.
- Click Done.
- Open GigaFox.
- Navigate to Systems > iOS Management.
- Scroll down to iOS Provisioning Status, under Upload provisioning profile, click Choose File.
- Once the profile is uploaded, the device will be provisioned and ready to be connected through GigaFox.
- Restricted access to private key: Failed:
Available signing certificate not valid. An associated private
key has restricted access.
To allow private key access : - Open Keychain Access.
- Under System > My Certificates, right-click on the private key.
- Under Access Control, select Allow all applications to access this item.
- Click Save Changes.
- If prompted, enter your computer's login password to modify the System Keychain.
- Expired Certificate: Failed: Certificate is
expired.
To upload a valid certificate: - Open Keychain Access and navigate the the iPhone Developer certificate associated with your provisioning profile.
- Click the disclosure triangle to reveal the its certificate.
- Highlight the certificate and private key, right-click and select the delete option or hit delete on your keyboard.
- If prompted, enter your computer's login password to modify the System Keychain.
- Follow the steps to create an iOS Developer Certificate.
- Go to developer.apple.com, click on Provisioning Profile, navigate the profile with the expired certificate, and select Edit.
- On the Edit iOS Provisioning Profiles (Development), in the Certificates section, Select All, and click Generate.
- Go back the Provisioning Profiles, select the profile and click Download.
- Follow the steps to upload the certificate and profile to GigaFox.
- Missing Certificate: Failed: No signing
certificate available.
To add a certificate to the profile: - If a certificate has not already been created, follow the steps to create an iOS Developer Certificate.
- If a certificate has been created, on the developer.apple.com account, go to Provisioning Profiles > Development, click on the profile and click Edit.
- On the Edit iOS Provisioning Profiles (Development), in the Certificates section, Select All, and click Generate.
- On the Your provisioning profile is ready page, click Download.
- Follow the steps to upload the certificate and profile to GigaFox.
- Expired Provisioning Profile: Failed: Profile expired (expiration date). To renew an expired profile:
- Go to developer.apple.com, under Provisioning Profiles > go to All or Development, select the expired profile and click Edit.
- On the Edit iOS Provisioning Profiles (Development) Scroll to the bottom, then click Generate.
- Follow the steps to upload the certificate and profile to GigaFox.
A Registration complete dialog will display if the device(s) was properly registered.
Create an App ID
Apple's App ID is a two-part string, a Team ID and Bundle ID, which identifies one or more applications from a single application development team. For example, 123ABC456XYZ.com.companyname.appname.
To create an App ID (if a suitable one does not yet exist):
The newly created App ID will now be listed on the Apple Developer account under Identifiers > App IDs.
Create a Developer Certificate
The certificate is a public/private key pair identifier. This identifier is needed to assure that the right user or team has access to the application.
Developer certificates can be created through Xcode or the Apple Developer account. Both options are listed below.
To create an iOS Developer Certificate through Xcode:
To create an iOS Development Certificate through the Apple Developer Account:
Once the certificate is created, through Xcode or the Apple Developer Program verify:
After the provisioning profile and certificate has been uploaded to GigaFox, common issues will be detected and clear messaging will describe the issue.
Create .p12 Certificate
Adjust Keychain Access Settings
Create A Provisioning Profile
Install the Provisioning Profile and Certificate on GigaFox
Provisioning Profile and Certificate Error Messaging
If after uploading the certificate and profile, the device(s)
associated with the profile are not provisioned, clear error
messaging will indicate if the issue(s) stems from the certificate
and/or the provisioning profile.
Error messages will be located in the iOS Provisioning Status
section, either under Installed provisioning profiles or
Available signing certificates.

The following is a list of GigaFox error messages and how to troubleshoot the issue:
iOS Provisioning Tool
The process outlined above is the intended method to provision iOS devices. If an error occurs and the certificate/private key are unable to load onto the GigaFox GEM, the iOS Provisioning Tool can be used to complete the provisioning process as long as the profile components have been created and are available through Xcode.
iOS Provisioning Status
On the System > iOS Management page, the provisioning status for each iOS device will be displayed iOS Provisioning Status > Devices. Devices that have been properly provisioned will display checkmarks for deviceControl and Provisioning Profile.
